
The internet is a wonderful thing, and there are already many posts on the internet about creating a WordPress Theme. When searching for hints and tips on how to create a theme, I found lots of tutorials, but many were out of date, or took shortcuts to the final step. I wanted to blog about my findings in order, mainly, to make it easier for me next time I have to create a WordPress Theme, but I also hope it may be useful for others too.
Your best friend with theme development will always be the WordPress Codex. If you aren’t familiar with the Codex, now would be a great time to head over to https://codex.wordpress.org/Theme_Development and have a quick look around, as this will likely become your best friend. I also find the Theme Handbook essential when developing https://developer.wordpress.org/themes/getting-started/ as there are many golden nuggets in there.
I’m not going to tell you how to setup your Development Environment as there are plenty of tutorials already out there. I have developed both on local environments and online, but with the amount of files you are going to be transferring it is probably better to develop in a local environment.
First I create my empty style.css and index.php files and uploaded them to my development environment. Inserting the style.css heading enabled me to activate the new theme and try it out.
/*
Theme Name: JadeResources
Theme URI: https://jaderesources.co.uk/themes/jaderesources
Author: Jade Resources
Author URI: https://jaderesources.co.uk/
Description: Initial theme design for Website
Version: 0.1
License: GNU General Public License v2 or later
License URI: http://www.gnu.org/licenses/gpl-2.0.html
Text Domain: jaderesources
Tags:
This theme, like WordPress, is licensed under the GPL.
*/
I find it useful to put all the heading options in when designing a theme so when it comes to publishing it you only need to update them. Personally I always keep the version number under 1 during development so that once it is published I can publish it as version one.
Currently the theme does nothing but create a blank page. Time to start adding some code.
Open up index.php and start typing up your basic structure
<!DOCTYPE html>
<html lang="en">
<head>
<title>Jade Resources Template</title>
</head>
<body>
<div class="site">
<div class="container">
<div class="header">
<h1 class="site-title">Site Title</h1>
Site Tagline
</div>
<!-- /.header -->
<nav id="site-navigation" class="main-navigation" role="navigation">
<ul>
<li><a href="#">Welcome</a></li>
<li><a href="#">About</a></li>
<li><a href="#">Websites</a>
<ul>
<li>Dropdown 1</li>
<li>Dropdown 2</li>
</ul>
</li>
<li><a href="#">Link</a></li>
<li><a href="#">Link</a></li>
<li><a href="#">Contact</a></li>
</ul>
</nav>
<!-- .main-navigation -->
<div class="container">
<div class="main">
<div class="blog-post">
<h2 class="blog-post-title">Sample blog post Title</h2>
January 1, 2018 by <a href="#">Ed</a>
This blog post shows a few different types of content that's supported and styled with Bootstrap. Basic typography, images, and code are all supported.
<hr />
</div>
<!-- /.blog-post -->
</div>
<!-- /.main -->
<div class="sidebar">
<h4>About</h4>
Etiam porta <em>sem malesuada magna</em> mollis euismod. Cras mattis consectetur purus sit amet fermentum. Aenean lacinia bibendum nulla sed consectetur.
</div>
<div class="sidebar-module">
<h4>Archives</h4>
<ol class="list-unstyled">
<li><a href="#">January 2017</a></li>
<!-- More archive examples -->
</ol>
</div>
<!-- /.blog-sidebar -->
<footer>
<div class="site-info">
Copyright © 2018
</div>
<!-- .site-info -->
</footer>
</div>
<!-- /.container -->
</div>
<!-- /.site -->
</body>
</html>
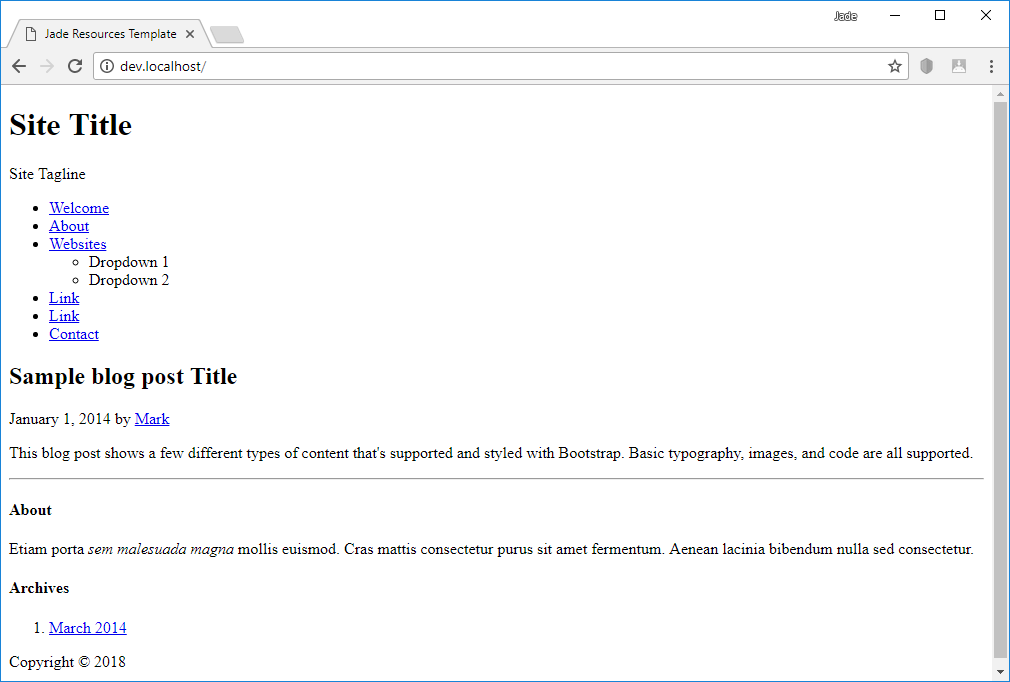
With that in place you now have a static basic website design. Reload your website and you should see what you have just created.
Now add some code to style.css to start changing the look of the webpage. I follow the WordPress default themes practice of including a contents section (expand and organise as you go along) and add a reset section before any custom code.
You could include the reset section in a separate stylesheet, but the more files loaded when the website opens the slower the connection between client and server.
I use normalize.css rather than reset.css as normalize keeps some HTML ‘essentials’ like <sup> and <sub>, whereas reset.css wipes out all of the HTML markup. I find it useful to download a fresh copy of normalize.css for each project.
Head over to their github page http://necolas.github.io/normalize.css/ and download a fresh copy. Normalize is well commented so you can understand what each part does. Feel free to take out the comments, but they don’t add a huge amount more space and will help others to understand your code better.
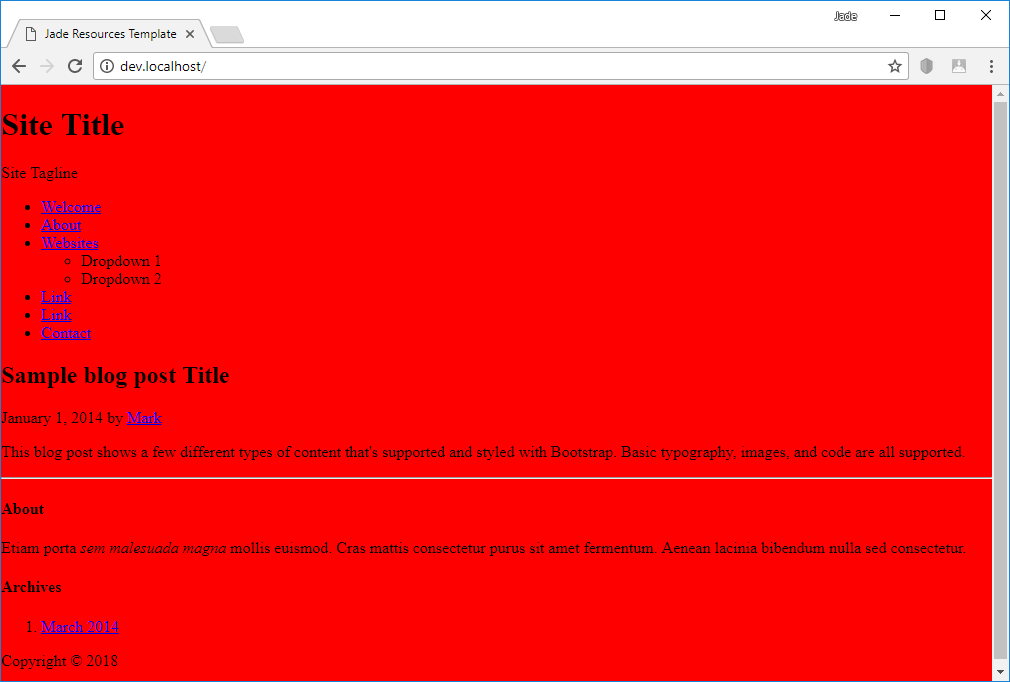
Once Normalize is added, I usually add a background colour to test whether everything is working properly.
 body {
background-color: red;
}
During initial CSS testing I always use bright / garish colours because it is clear if the CSS is being applied. Refresh your website and see if everything works. Your website should now be displayed but with a red background.
Hmm… it didn’t work did it? That is because of the way WordPress adds CSS. It took me a long time to figure this out. Yes I could add style.css into the head of my index file, and that is the easiest way to add stylesheets to your website, but once you start adding plugins to your WordPress site the order of stylesheets can get confused. Therefore you need to enqueue the script from functions.php.
Go ahead and create functions.php inside your theme folder. On all my template files I like to include a header comment to identify what the page is designed for, as well as giving details on when the page was introduced to the theme:
<?php /*
 *
 * The functions file
 *
 * @package JadeResources
 * @since JadeResources 1.0
 */
?>
You then need to create a function to enqueue the style.css file. You can enqueue any scripts of styles that are essential to your theme within this function, but at the moment we only have the main stylestyle sheet.
Enqueue the stylesheet like this:
/*
 * Enqueue scripts and styles for the here here
 */
function jaderesources_scripts() {
     wp_enqueue_style( 'style', get_stylesheet_uri(), false, ‘0.1’, ‘screen’ );
}
add_action( 'wp_enqueue_scripts', 'jaderesources_scripts' );
Take a look at the WordPress Codex for full details on this function, but essentially it is telling your site to load a stylesheet with a handle of ‘style’ from the default theme directory, without any dependencies on other stylesheets. It is giving it a version number of 0.1 and saying it is for all screen media types. Upload the functions.php file into your theme directory. You also need to add a line to your index.php page. Just before the closing </head> tag add the code <?php wp_head(); ?>. According to the Codex this line of code prints scripts or data in the head tag on the front end. It is essential to place it just before the closing </head> tag as many plugins rely on it, and it is what makes our stylesheet from functions.php work. Upload index.php and functions.php to your development environment and refresh your browser. You should now see your basic site with your background colour.
Congratulations, you now have a basic website, with a static index page with a properly enqueued stylesheet.
My next step is now to start breaking down the index.php page into templates. I find it much easier to do now before there is more wordpress code added as it eases the transition between a one page design and multiple templates. The reason for using templates is simple. It keeps all design in one place and if any changes are made then you know they will be replicated to all pages as the server creates the full page from the templates.
The initial WordPress templates are header.php, footer.php, and sidebar.php. Create these and copy your respective parts of index.php into these pages.
How you divide up your site depends on your initial index.php layout, but from my original code header.php includes everything up to <div class=”main”>, sidebar.php includes everything between </div> <!– /.main –> and </div><!– /.blog-sidebar –>, and footer.php contains everything from <footer> to the end of the file.
Now you need to call your template files into your index file to place everything back together. Add get_header(); get_sidebar(); and get_footer(); into your index.php file in their respective places to re-create the full index file.
Index.php should now look like this:
<?php /*
 *
 * The main template file
 *
 * @package JadeResources
 * @since JadeResources 1.0
 */
 get_header(); ?>

    <div class="blog-post">
      <h2 class="blog-post-title">Sample blog post Title</h2>
      <p>January 1, 2014 by <a href="#">Mark</a></p>

      <p>This blog post shows a few different types of content that's supported and styled with Bootstrap. Basic typography, images, and code are all supported.</p>

      <hr />
    </div><!-- /.blog-post -->
<?php get_sidebar(); ?>
<?php get_footer(); ?>
Our basic static theme for WordPress is almost complete. We just need to add one more php command to footer to call the rest of the WordPress essentials in. Add <?php wp_footer(); ?> in footer.php just before the closing </body> tag.
Footer.php should now look like this:
<?php /* * * The footer file * * @package JadeResources * @since JadeResources 1.0 */ ?> <footer> <div class="site-info"> <p>Copyright © 2018</p> </div><!-- .site-info --> </footer> </div><!-- /.container --> </div> <!-- /.site --> <?php wp_footer(); ?> </body> </html>
Now login to your WordPress website by visiting /wp-login.php. Once you are in the dashboard click back to the main site and you should see the WordPress Admin Bar at the top of your webpage.
You can now spend some time creating your basic styles in styles.css to give your website a unique design. Once you have done this you will be ready to start adding your dyncamic content from the WordPress Database. For the next tutorial go to theme-development-part-2