Reverse Proxy

Having run a reverse proxy on my pi for a couple of months, I though it about time to write an article on how I did it.

First make sure your website is running on your private server. Running a basic apache2 test page will be enough to get you up and running.

Having installed nginx, either by compiling it from source code or installing it from apt, you need to create the configuration file, with the name to help you identify the config:

sudo nano /etc/nginx/sites-available/example.uk.conf

Inside the config file you need to setup the parameters, changing details for your setup.

# Main URL
server {
	listen 80;
	server_name example.uk;
	location / {
		proxy_pass http://IP_ADDRESS/;
	}
}

Save and exit the file.

Create a symbolic link to enable the new config file:

sudo ln -s /etc/nginx/sites-available/example.uk.conf /etc/nginx/sites-enabled/example.uk.conf

Test your nginx configuration:

sudo nginx -t

Reload nginx:

sudo systemctl reload nginx

Ensure that you have port forwarded port 80 on your router to your reverse proxy, and provided you have dynamic dns setup on your domain name you should be able to visit example.uk and see your site.

You can now configure your site to use HTTPS. You will need to install the free certbot client:

sudo apt-get install certbot -y

certbot needs port 80 to get the certificates, so you will need to stop your nginx service temperarily

sudo service nginx stop

Because port 80 is already forwarded to your reverse proxy, everything is in place to get your certificate. Replace example.uk with your domain name.

certbot certonly --standalone -d example.uk -d www.example.uk

After running these commands, you will be prompted to enter some details, such as your email address. These details are required for Let’s Encrypt to keep track of the certificates it provides and also allow them to contact you if any issues arrive with the certificate.

Once you have filled out the required information, it will proceed to grab the certificate from Let’s Encrypt. If you get any errors, make sure you have directed your domain to your IP address, make sure port 80 and port 443 are unblocked and forwarded, and make sure nginx and apache are not running.

The certificates that are retrieved the certbot client will be stored in the following directory. Each domain name has its own directory

/etc/letsencrypt/live/

You can now add the SSL certificate to your reverse proxy configuration. Navigate to your config folder, and open your config file you created earlier

cd /etc/nginx/sites-available

sudo nano example.uk.conf

Under your server {} block, create a new server block. You can copy the original block if your prefer. Update the listening port to port 443 and include the ssl_certificate and ssl_certificate_key instructions to link the SSL certificate.

server {
	listen 443 ssl;
	server_name example.uk;

	ssl_certificate /etc/letsencrypt/live/example.uk/fullchain.pem;
	ssl_certificate_key /etc/letsencrypt/live/example.uk/privkey.pem;

	location / {
		proxy_pass http://IP_ADDRESS/;
	}
}

Now edit the original server{} block to force your site traffic to use your SSL site rather than the original site. This creates a perminant 301 redirect to the https url.

server {
	listen 80;
	server_name example.uk;

	return 301 https://$host$request_uri;
}

In order to get wordpress working on my raspberry pi behind the reverse proxy, I have also had to include these lines in the 443 location block:

proxy_set_header X-Forwarded-Proto https;
proxy_buffering on;
proxy_buffers 12 12k;
proxy_redirect off;
proxy_set_header X-Real-IP $remote_addr;
proxy_set_header X-Forwarded-For $remote_addr;
proxy_set_header Host $host;
client_max_body_size 20M;

So my whole config file now looks like this:

# Main URL
server {
	listen 80;
	server_name example.uk;

	return 301 https://$host$request_uri;
}
server {
	listen 443 ssl;
	server_name example.uk;

	ssl_certificate /etc/letsencrypt/live/example.uk/fullchain.pem;
	ssl_certificate_key /etc/letsencrypt/live/example.uk/privkey.pem;

	location / {
		proxy_pass http://IP_ADDRESS/;
		proxy_set_header X-Forwarded-Proto https;
		proxy_buffering on;
		proxy_buffers 12 12k;
		proxy_redirect off;
		proxy_set_header X-Real-IP $remote_addr;
		proxy_set_header X-Forwarded-For $remote_addr;
		proxy_set_header Host $host;

 		client_max_body_size 20M;
	}
}

Install WordPress on Raspberry Pi

Having setup a Raspberry Pi as a webserver, you may want to run WordPress on it.

SSH to your Pi and change into the web root folder:

cd /var/www/html

remove all the files currently there

sudo rm *

Download the latest WordPress package

sudo wget http://wordpress.org/latest.tar.gz

Extract the Tarball to get to the wordpress files.

sudo tar xzf latest.tar.gz

Move the extracted files into the current directory and remove the tarball file.

sudo mv wordpress/* .

sudo rm -rf wordpress latest.tar.gz

Raspberry Pi Webserver

Yes, there are tens, if not more, of tutorials on how to setup a raspberry pi as a web server. The raspberry pi foundation even have a detailed tutorial. However, I have found that I tend to look at several websites when settings up my webservers, so I wanted to refine everything into one place.

First start off with a fresh install of raspbian – I always use lite on web servers as I don’t need all the extra software.

Run the normal update and config with

sudo apt update
sudo apt upgrade 
sudo raspi-config

and set a static IP address by editing /etc/dhcpcd.conf and inputting the following with the appropriate settings for your setup

interface eth0
       static ip_address=xxx.xxx.xxx.xxx/24
       static routers=xxx.xxx.xxx.xxx
       static domain_name_servers=xxx.xxx.xxx.xxx
interface wlan0
       static ip_address=xxx.xxx.xxx.xxx/24
       static routers=xxx.xxx.xxx.xxx
       static domain_name_servers=xxx.xxx.xxx.xxx

Apache2

Once updated, and assigned an IP you can setup the web server

sudo apt install apache2 -y

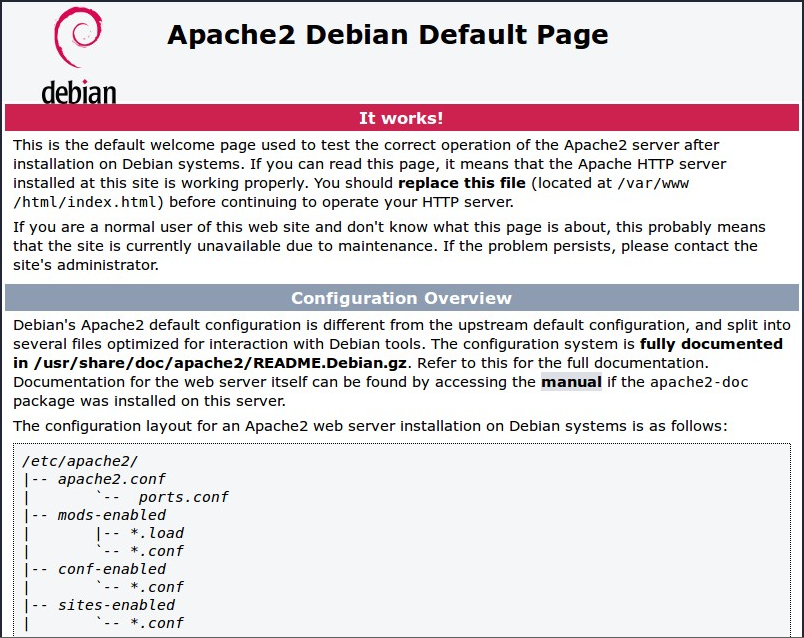
Once installed, browse to the IP address of the pi and you should see the Debain default web page.

If you want to change the port that the web server is working on edit the ports.conf file in /etc/apache2, and the 000-default.conf file in sites-available,

PHP

To install php run the following command

sudo apt install php libapache2-mod-php -y

You can check the install worded by creating a phpinfo page

sudo nano /var/www/html/phpinfo.php

with the following code

<?php phoinfo(); ?>

Congratulations, you now have a basic web server up and running on your pi.

If you intend on using a database with PHP you need to install the connector:

sudo apt install php-mysql

Database

Many websites are dynamic websites, and run on a database. Some sites run MySQL, but many sites are now using MariaDB. Install mariaDB with the following command:

sudo apt-get install mariadb-server

MariaDB will configure itself during installation. You then need to secure the install with the following:

sudo mysql_secure_installation

Set a password and answer ‘y’ for all the questions.

You can now log into the mysql database

sudo mysql -u root -p

You need to create a database, and a user to interact with that database. Use ‘CREATE DATABASE’ and the database name e.g. website

CREATE DATABASE website;

Next create a user by running the following command, change the ‘user’ and the ‘password’ to suit your needs.

CREATE USER 'user'@'localhost' IDENTIFIED BY 'password';

The give the new user access to the database you created earlier

GRANT ALL PRIVILEGES ON website.* TO 'user'@'localhost';

Finally to allow the new user access to the database, you need to flush the priviledges. Do this with the following command

FLUSH PRIVILEGES;

PHPMyAdmin

Install PHPMyAdmin on the pi with this command:

sudo apt install phpmyadmin

PHPMyAdmin will then install on your pi. There are various configuration steps needed to setup PHPMyAdmin. When prompted which type of webserver you want to run PHPMyAdmin on choose ‘apache2’.

Now you need to configure PHPMyAdmin for your MySQL server.

You will need to specify a password for PHPMyAdmin to interact with your MySQL database – choose a strong password, and one that is different to the root password you set earlier.

PHPMyAdmin will by default block access to the MySQL database. If you didn’t create a user earlier, do so now.

To access PHPMyAdmin through your wesbite, you need to edit the ‘Apache2.conf’ file and add the PHPMyAdmin config to the bottom of the file:

Include /etc/phpmyadmin/apache.conf

Now restart Apache2.

sudo service apache2 restart

Your webserver is now up and running. You can see how I installed WordPress in the next post.

Arduino Pro Mini

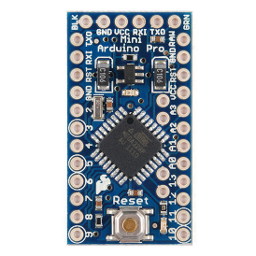
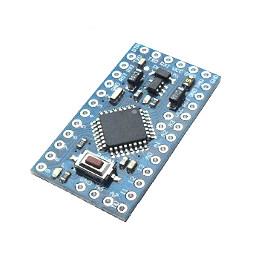
The Arduino Pro Mini is a small board with all surface mount parts. It has all of the I/O of the Arduino Uno, plus the addition of two more analog inputs. There are a couple of models of this card, one 5V/16MHz, and one 3.3V/8MHz.

There is nothing on it that doesn’t contribute to the basic functionality of the ATmega328. You could buy a knock-off Arduino Uno for a little less, but in fact it has too much on it! If you are doing basic R&D – use the Uno. It allows us to use shields, which provide modules we may need. When the R&D is done, out come the Arduino Pro Minis for the actual finished project.

The pins on the Arduino Pro Mini and the Arduino Pro Micro are about the same, upto the SPI port on 11, 12, and 13. At that point, the Pro Micro changes to 14, 15, and 16. The PWM pins on the Pro Mini are identified by circles around the pin, just like the Pro Micro.

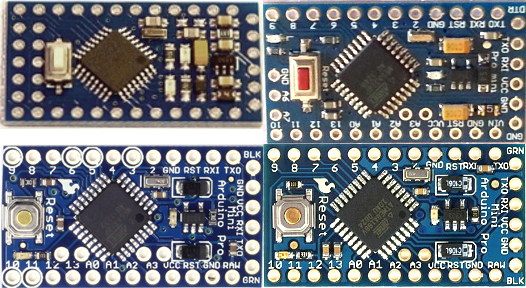
It must be someone else’s favorite, too, because it is one of the most copied boards out there. Not every copy is an exact copy, though, even the originals! For an example, see the image below:

As you can see from the image, there are four different boards, with different pinouts, all calling themselves Arduino Pro Mini. The ones that actually are Pro Minis are identified by the Sparkfun logo to the left of the ATmega328. Yet even they are different. The one in the lower left has A0-A7, while the one in the lower right has only A0 through A5. The one in the upper left has A0-A7 and an SPI port. The one in the upper right has A0-A7, but A6 & A7 are on the end of the board.

Arduino Pro Mini

ParameterValue
MCUATmega328
DigitalPins14
PWM6
Analog Inputs8
Analog Outputs0
Operating Voltage5 / 3.3
Operating Frequency16MHz
3.3V OutputNone
Test Current Draw5v=17mA 3.3V=2.5mA
Web SiteSparkFun Electronics

NOTES

  1. Information from manufacturers and other sources icluding www.arduino-board.com.
  2. Test current from sketch that exercises I2C, SPI, and analog pins.

Small Form Factor Arduinos

The small-form-factor boards are similar, but all significantly different. This comparison puts the differences in one place to make them easier to see.

The Pro Mini and Pro Micro of any brand of Arduino compatible board seem to be very popular. But choosing between them can be tough. There seem to be so many, and it is hard to distinguish between them. Here is a comparison on the size and features.

BoardMCUDIOPWMANLFLASHRAMEEPROM~$
Pro MiniATmega328P146832k2k1k$7 – $10
Pro MicroATmega32U4145432k2.5k1k$6 – $20
NanoATmega328P146832k2k1k$12 – $35
MicroATmega32U42071232k2.5k1k$7 – $25

The prices given above are a range from the cheapest clone to the most expensive genuine article in January 2014. Used in a development environment, where things are plugged and unplugged, powered up and down, jerked around on cables, the clones don’t hold up as well. Reports show failures from all of them clones or downright forgeries, and all from abuse. There has been no reports of failure in the field of either a clone or an original.

NOTES:

Taken from https://www.arduino-board.com/

Deek-Robot Pro Mini

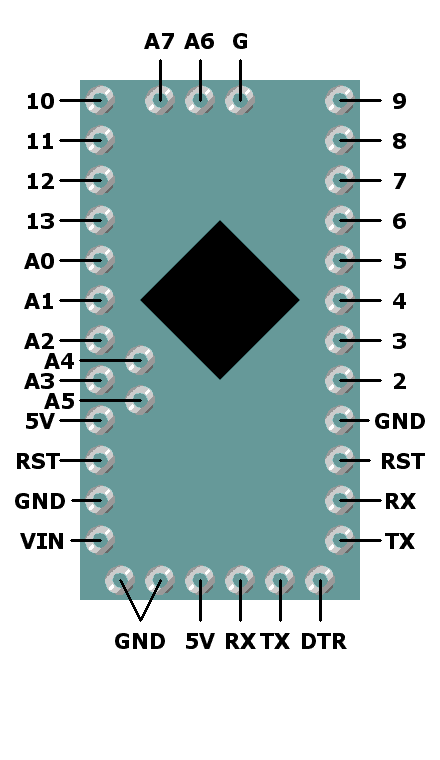
The Deek-Robot Pro Mini is nearly identical to the Sparkfun Arduino Pro Mini. It has all of the I/O of the Arduino Uno, plus two more analog inputs. There is only a 5V version of the board. The “extra” I/O is at the end opposite the programming connector. This is slightly different than the Sparkfun Arduino Pro Mini boards, which have the analog pins in an unhandy position in the interior of the board. Either way, you can’t put pins in them and use them on a breadboard (the pins would need to point up). With the Deek-Robot Pro Mini, the extra pins at the end are at least on the same 0.1″ centers as the rest of the connectors, even though A4 and A5 are off by 0.05″.

The Deek-Robot Arduino Pro Mini is probably the most ripped off board there is. Everyone is counterfeiting the board, or at least stealing the name. That is likely because it is the most popular of the small form factor boards by far.

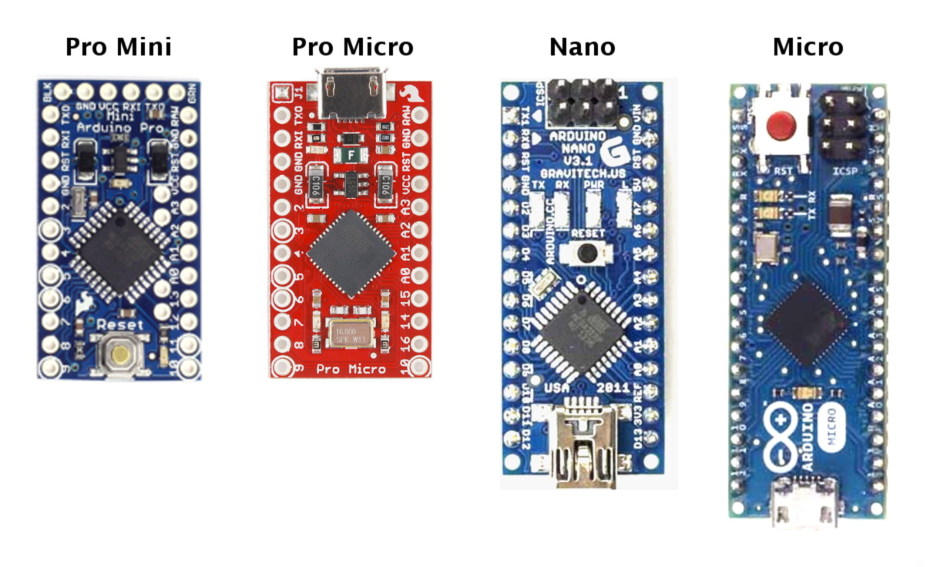
A size comparison of the four small form factor Arduino boards is helpful to see where the Deek Robot Pro Mini fits in the tiny Arduino board lineup.

ParameterValue
MCUATmega328
DigitalPins14
PWM6
Analog Inputs8
Analog Outputs0
Operating Voltage5
Operating Frequency16MHz
3.3V OutputNone
Test Current Draw18mA
Deek-Robot Pro Mini Pinout

NOTES:

  1. Information from manufacturers and other sources, including https://www.arduino-board.com/
  2. Test current from sketch that exercises I2C, SPI, and analog pins.

Raspbian Downloads

The release of the Raspberry Pi 4B has meant the release of the new version of Raspbian – Buster. Then my Pi-Hole went wrong – it crashed. Unrecoverable. I downloaded Buster and installed Pi-Hole – it seemed to work, but the web interface wouldn’t load, and the DHCP server didn’t work. Checking the Pi-Hole support pages showed Buster wasn’t supported. I had to get hold of a version of Stretch. But where? No where on the RPi website could I find an archive of previous releases. Then I found them lurking on the internet – hidden from view – but they were there.

And here are the links:

Rasbian Desktop with Recommended Software Archive: https://downloads.raspberrypi.org/raspbian_full/images/

Raspbian Desktop Archive: https://downloads.raspberrypi.org/raspbian/images/

Raspbian Lite Archive: http://downloads.raspberrypi.org/raspbian_lite/images/

Installing Server 2016 on HP Microserver Gen8

I have been running a Domain in my small office for several years. I had a problem a couple of months back where Server 2012 R2 stopped working. I went ahead and purchased a version of Server 2016. I have had several issues installing the new server software, so hopefully the hints and tips below will help me in the future and anyone else who stumbles across this post.

I copied the ISO image on the DVD onto a USB drive. First I added the DVD into my computer, and checked it worked. I then opened an elevated command prompt.

diskpart

list disk

select disk ?

list disk

Change the ? to the drive letter of the USB drive you have inserted. The second list disk command will show you have selected the correct disk – it will have a * at the start of the line.

clean

create partition primary

select partition 1

active

format fs=ntfs quick label="Server2016"

exit

Now you need to copy the boot folder from the DVD to the USB drive. Stay in CMD and change into the DVD drive folder (in my case F:)

F:

cd boot

bootsect /nt60 D:

Note: D is the drive letter for the USB stick.

Now copy the boot folder to the USB drive.

xcopy F:\*.* D:\ /E /H /F

install.wim will take a long time to copy – just be patient.

Next I had to install the USB drive in the internal USB port inside the cover. No other USB port worked for me. I plugged in the USB disk and booted the Microserver. Pressing F11 will select the boot menu, and option 3 booted from USB.

Once windows loaded, I was unable to find any drives (previously configured in Intelligent Provisioning). So I searched the internet for the “HP Microserver Gen8 Disk Drivers” I found the correct driver on this site. I extracted the drivers onto the second USB drive and inserted the second stick into one of the USB2 ports on the front of the server. The Windows installation allowed me to search for the drivers for the disk array and install. Once the driver was installed I was able to finish the installation of Server 2016 without any issues.

Raspberry Pi Update fails

Recently I was trying to update Raspbian when my SSH connection failed.  This meant that the update did not complete successfully.  To prevent issues like this in the future I found an app called ‘screen’.  More on this to follow.

The failed update meant that I couldn’t complete any further updates.  When trying to run:

sudo apt-get upgrade

I would get the error:

dpkg was interrupted, you must manually run 'sudo dpkg --configure -a' to correct the problem.

Running sudo dpkg –configure -a did not correct the problem and caused the SSH connection to time out.  The solution was to flush dpkg with the command below:
cd /var/lib/dpkg/updates
sudo rm *

This removed all ‘bad’ items.  Running the apt-get update and apt-get upgrade commands then worked.

Mounting a Windows Network Drive

Non-Persistant Connection

I have often found it necessary to access files on my raspberry pi that are hosted on either my windows computer, or on an Windows File Server on my Active Directory Network.

In order to mount a network drive you need to have a folder on the RPi ready.  This can be anywhere, depending on your needs.  If you are going to mount the share permanently, I recommend creating a directory in the /mnt directory. Alternatively, if it is only a quick file access you can create a new directory in the /home/pi folder.

Either way, change directory into the parent directory you are creating a folder in

cd /mnt

or

cd /home/pi

you can now create your new directory

sudo mkdir directory-name

change directory-name to be something of your choosing that corresponds to what you are mounting.

To mount your folder type the following into your terminal

sudo mount -t cifs -o username=yourusername,password=yourpassword //server/share /path/to/directory-name

If you Have got spaces in your //server/share path, enclose the path with double quotes e.g. “//server/share path”.  Remember to replace yourusername and yourpassword with the correct values to allow you to log in to your network share.

To check if you have correctly mounted your network share run the following command

df -h

You will see a list of all your mounted volumes, one of which should be the one you mounted above.  Alternatively (or as well) navigate to the share path and list the contents of the folder e.g.

cd /mnt/directory-name

ls

If there are any files on your share, you will now be able to see them.

Persistent Connection

The initial steps are the same as for a non-persistent connection, however rather than mounting the share via the terminal, we need to mount it via fstab. Edit the fstab

sudo nano /etc/fstab

Append the following lines to the end of fstab.

//server/share /path/to/directory-name cifs username=yourusername,password=yourpassword 0 0

Save the file, and run

more /etc/fstab

Your mount should be listed in information on screen. Reboot your RPi and run

df -h

You should still see your mount, and be able to access your directory.

Unmount a share

Run the following command in the terminal

sudo umount //server/share